Crazee Revolution Solution
How To Solve The “Crazee Revolution” “elogiq Tripod” Puzzle
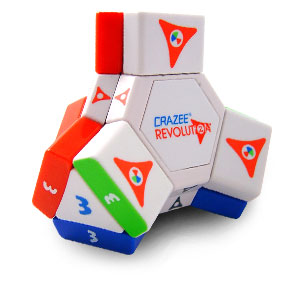
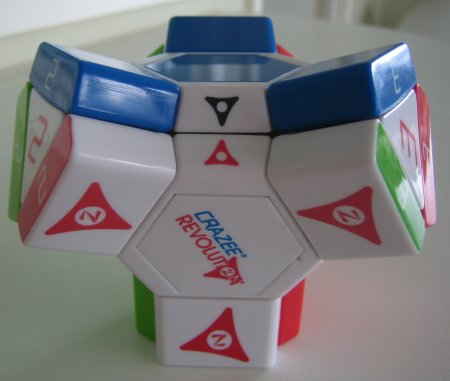
I bought one of these puzzles on 8th October 2007 from Hamleys toyshop in London. They are exorbitantly priced at double the online RRP, so if you want one I recommend you get it direct from the manufacturer’s website. The puzzle I bought was the coloured “Crazee Revolution”. I’ve noticed that there also seems to be a rival version of this puzzle called the elogiq Tripod.
You can see a video of this puzzle in action here.
SPOILER WARNING: This article tells you how to solve the Crazee Revolution. If you do not want to ruin your enjoyment of this puzzle, then please do not read any further.
Although this puzzle looks pretty daunting, I actually found it relatively straightforward to complete. It took me about two hours to come up with the solution presented here. After coming up with this I searched Google to see if I could find any other solutions and couldn’t find anything. Looks like I could be first to publish a solution!
Basic Solving Order
There are three stages to solving the Revolution.
1) Get the coloured pieces onto their matching coloured hexagonal faces.
2) Get the numbered pieces in the correct order on each hexagonal face. (ie so that the numbers match on the triangular faces)
3) Align the small coloured arrows.
The moves presented here allow the stages to be completed in order without rearranging pieces that have already been placed.
Stage 1 - Move coloured pieces to matching faces
Most of this stage is straightforward and is left for you to work out for yourself. (ie I’m too lazy to explain the easy bits!) You should have no bother getting to a point where every face has the correct colours but with only a couple of the last pieces out of place. I have found the following move sequence (and its inverse) to be sufficient for this stage:
T, R, T (or T- for opposite direction), R-, T-
where with the puzzle held as in the diagram below
T denotes a clockwise turn of the top knob R denotes a clockwise turn of the right hand (green) face T-/R- means turn the face anticlockwise
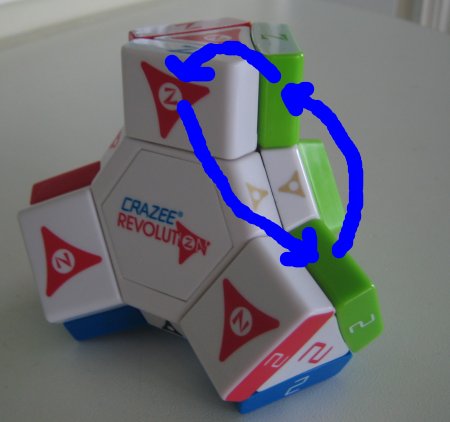
The blue arrows show how this move sequence moves the pieces on the puzzle.
If you did this sequence on a solved puzzle you’d get the following:
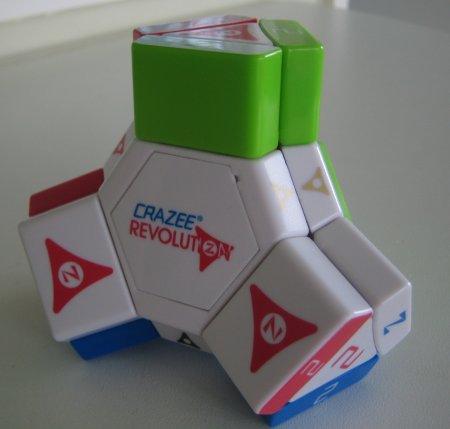
If you did the inverse of the sequence (by doing the T- move, instead of the T move, where indicated) then you would move the same pieces but in the opposite direction from the blue arrows. The inverse sequence would take the puzzle in the above state and return it to the solved state, for example. Doing either the sequence, or its inverse three times in a row would leave the puzzle unchanged.
In Rubiks Cube terminology the sequence is known as a 3-Cycle as it cycles a group of three pieces. Incidentally, I found this description of Commutators very useful in solving this puzzle.
At this stage all we are interested in is placing the coloured pieces onto the correct hexagonal faces. I have found that with a little bit of tweaking, the above sequence is all that I need to complete this step.
Stage 2 - Get the numbered pieces in the correct order on each face
We’re not worried about lining up the arrows for now, so the worst position we can be in for any face is that two of the pieces need to swap places. Start by spinning all the faces to solve the “Z” pieces.
Hold the puzzle as shown below with the “Z” triangular face pointing downwards.
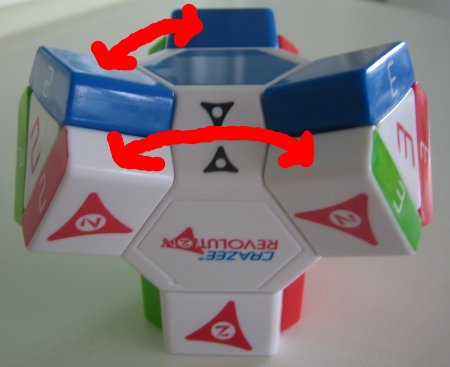
Use the following move sequence for each of the front faces where the left and right pieces need swapping. Faces will be swapped, as shown by the red arrows above.
R, T-, L-, T-, R-, L
where with the puzzle held as shown
R denotes a turn of the right hand triangular face (with a 3 on it in the picture) L denotes a turn of the left hand triangular face (with a 2 on it in the picture) T denotes a turn of the top hexagonal face (blue in the picture) F denotes a turn of the front face (white with the logo in the picture) - means the turn should be anti-clockwise.
As far as I can tell it is not possible to get the top (blue in the picture) faces wrong if all of the other faces are correct. So, simply repeat this algorithm for the side faces and the top face should come out with the pieces in the right order. You’ll then need to give that face one or two turns to rotate the pieces into place.
Stage 3 - Align the arrows
Start by working out which hex-faces you need to turn to make the correct arrows line up. Usually it is only one or two turns of one or two of the faces. When working this out you can spin the coloured faces around without disturbing the puzzle much, but before you continue you’ll need to match up the numbers with the triangular faces again.
Now that you know which faces need to rotate, you can use the following move sequence to rotate a face whilst keeping the numbers still.
R, T, L-, T-, R-, L- F (or F- for opposite rotation) R, T, L-, T-, R-, L- F (or F- for opposite rotation)
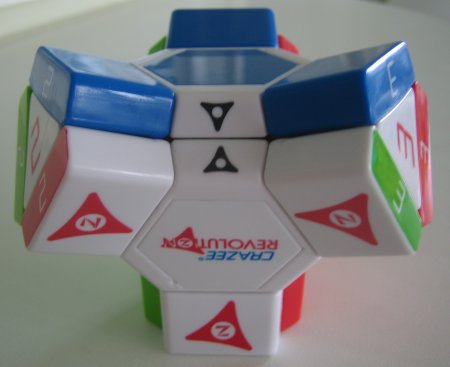
where with the puzzle held as shown
R denotes a turn of the right hand triangular face (with a 3 on it in the picture) L denotes a turn of the left hand triangular face (with a 2 on it in the picture) T denotes a turn of the top hexagonal face (blue in the picture) F denotes a turn of the front face (white with the logo in the picture) - means the turn should be anti-clockwise.
Doing this sequence on a solved puzzle will rotate the front face anti-clockwise, leaving the numbers unchanged, as shown below
Doing the “opposite rotation” version of the sequence will cause the centre face to rotate clockwise.
You may notice that this sequence works by using a swapping move similar to the one in Stage 2 to swap two pieces, make a move, then swap back the two pieces we didn’t want to affect.
Simply use this sequence for each face that needs to be rotated and you will have solved your puzzle.
There are similar sequences that will rotate two faces at once, which you could use if you were trying to minimise the number of moves needed to solve the puzzle. For simplicity, however, I have presented a single algorithm that covers all of the cases you will encounter.
Summary
This puzzle turned out to be a lot easier than I expected to solve. There are only a couple of move sequences needed to complete the puzzle. It took me around two hours to work out a solution. Obviously (if you’ve seen other parts of my site, that is), I’m a reasonably experienced puzzle solver, so I perhaps had a bit of a head start on solving this puzzle. A lot of my time spent solving it was taken by me getting used to visualising the slightly unusual shape and rotations of the puzzle and drawing little pictures to note down my findings.
There may well be better ways of solving this puzzle than the method I have presented here.
The Crazee Revolution version of the puzzle seems to be well made and manipulating the faces is a pleasant tactile experience with all the parts clicking neatly into place. I find Hamley’s rip-off pricing strategy somewhat offensive, but then that didn’t come as a big surprise coming from one of London’s premier tourist traps.
