How to connect a Commodore 64 1541 disk drive to your PC over USB
I recently dug out my old Commodore 64 computer hoping to retrieve some of the old code I wrote when I was younger. It was my plan to transfer it to my PC so that I could run it using the Vice C64 emulator.
As I no longer own a television I couldn’t connect up the C64 and see it working. Even if I could, I’d still have been left with the problem of how to get the data from the 5.25” disks and onto the PC. There was a mass of outdated information on the internet about how to make a cable to connect to a PC parallel port, but it’s been many years since PCs have had those. There were also a couple of nice looking products for extracting data from floppies (Kryoflux) and for connecting a drive over USB (ZoomFloppy) but given that I didn’t even know if my disks would still work, I didn’t really want to pay a lot of money for one of those.
And then I found this article. I don’t own a Teensy, however, I do own the very similar Minimus AVR and it turns out that it was perfect for the job!
Read on for instructions on connecting your Commodore 1541 to your PC, no special electronics knowledge required.
This is a very simple project. The hard work has all been done by other people. All you need to do is flash your Minimus with a hex code file, then connect up the correct output pins to your drive’s serial port. Depending how robust you want the final result to be you can either make up a proper cable and solder everything together, or you can do what I did and use a breadboard and wires poked into the drive’s serial connector socket.
Flash the Minimus
Download the zip file attached to this post. You will need to sign up to the forum to get access. Inside, there are three different .hex files. You will need to use file 2, the same one needed for the Teensy version of the connector.
To get this file onto your Minimus you will need to either install Atmel Flip, or on a Linux machine install dfu-programmer. To do that, follow the instructions here. They assume you know a bit about building on Linux and have already got some of the basic packages installed (such as the build-essentials) that you need for compiling.
Once you’ve got dfu-programmer or Flip installed, plug your Minimus into a USB port.
Put Minimus in programming mode by pushing Reset, push HWB (the button next to Reset), release Reset, release HWB. (Sounds complicated, but just roll your finger over the buttons!)
If you are using dfu-programmer, then you need to erase the Minimus before you can flash it. Atmel Flip does the erase and flash in one go.
To flash using dfu-programmer type:
sudo dfu-programmer atmega32u2 erase
sudo dfu-programmer atmega32u2 flash xum1541-CHEAP2-v07.hex
Then press Reset button
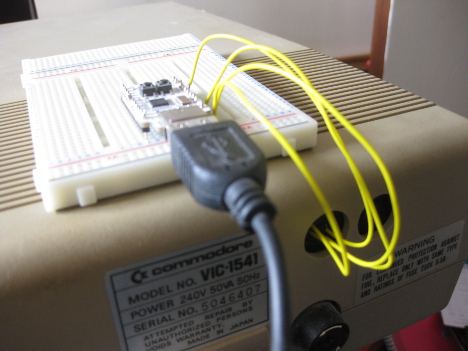
Connect Minimus to 1541 Disk Drive
Wire up the following connections:
PD0 on Minimus to DATA pin on drive Serial port PD1 to CLK PD4 to ATN GND to GND
Use this pinout diagram to help you know which pin is which on your drive. The Minimus pins are labelled on the board.
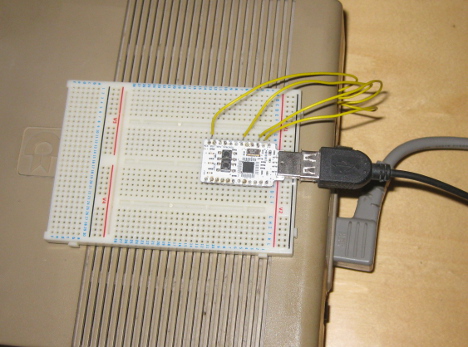
It is up to you how neatly you want to do this wiring. I have two rows of header pins soldered to my Minimus so that I can insert it into a breadboard. I then directly poked wires into the serial connector socket on the drive. Although this is very crude, and not something I’d really recommend, it worked for me.
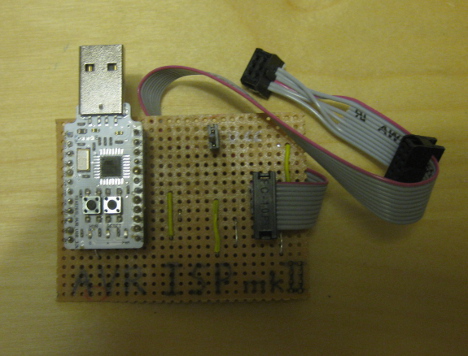
For finished Minimus projects, I make “shields” using header sockets, so that I can easily share the same Minimus across different projects. Below is an example of a AVRISP programmer shield for my Minimus. It is basically a breakout board for the Minimus pins. If I thought I’d ever need to use my 1541 cable again, I’d buy the proper connectors and make something similar.
Install PC USB Drivers
In order to control the 1541 disk drive from the PC, I used the OpenCBM software. To get this to work over USB you need to use the version on the ZoomFloppy site here.
If you are using Windows 8, then you will need to reboot in Advanced mode and disable driver signing before you are able to install the driver that comes with the OpenCBM package. There are instructions on how to do that here. After that, you plug in the Minimus, then go to the Devices manager in Control Panel and install the driver from there.
Transfer your Disks
All you need to do now is run the OpenCBM software and use it to transfer your disks. You’ll probably want to run “cbmctrl detect” to check you are connected to your drive. After that, use the d64copy command to transfer your disks. It’s very easy to do, but if you are stuck, the OpenCBM User’s Guide is here.